Web Optimization Techniques You Must Know
Performance isn't a nice-to-have, it's core to user experience. A slow app will feel clunky, unresponsive, and untrustworthy. Web tooling gives you levers to pull, but knowing where to look and what to measure separates junior developers from senior engineers.
This guide breaks down practical web optimization techniques you should understand, grouped by:
- Diagnostics
- React optimization
- Loading performance
- Frontend delivery.
1. Devs Tools
Before you optimize anything, measure. Guessing where the slowdown is will waste your time. Use the browser’s and React’s built-in tools to see exactly where your bottlenecks lie.
React DevTools
The React DevTools extension is your first line of defense against unnecessary re-renders.
-
Component Tree Tab
Lets you explore the full component hierarchy and its current states
Toggle these settings:
- Settings → General → Turn on "Highlight updates when components render". This visually highlight components re-rendering multiple times.
- Settings → Debugging → Turn off “Hide logs during second render”. For components re-rendering because of React Strict.
-
Profiler Tab
Think of it as the “Performance” tab but for React.
Press start recording, trigger events like buttons, then click stop. You’ll see a timeline of renders and state changes. The tallest bars represent the most expensive renders.
-
react-scan
An alternative to the Profiler that provides deeper insight into render performance in React apps. If you don't own the project, use the React Dev Tools Profiler instead.
Chrome DevTools: Advanced Tricks
-
Measure Unused JS and CSS
Open DevTools → Open Command Palette →
Show Coverage. The higher the unused percentage, the more dead weight in your bundle. Consider lazy loading or removing unnecessary libraries. -
Break on Attribute Modifications
Useful when working with third-party libraries or frameworks that modify the DOM through side effect (flickering issues, weird UI jumps, etc.) and you have no idea which script is responsible. This shows you which script touched the DOM.
In DevTools → Elements Tab, right-click a DOM element → Break on → Turn on "Attribute modifications". The breakpoint appears to the left. When the breakpoint triggers, inspector redirects you to the Sources tab where the script was executed.
-
CSS Overview
Go to DevTools →
command+shift+p"show CSS Overview" →CSS Overview Tab:a. Fonts: shows all the fonts used. You may eliminate unsued fonts, reduce amount of font sizes.
b. Colors: show all color schemes used in the application. You may eliminate unused, unnecessary, or identical colors.
c. Contrast issues: shows any issues with the contrast in your application.
d. Unused declarations: CSS properties that you can clean up.
-
Rendering Behavior
In
Redering Tab, use tools like:a. Layer Borders: visualize compositing layers
b. Emulate Focused Page: useful to keep modals or menus open for inspection. To activate, check "Emulate a focused page", then inspect the element as usual
c. Scroll performance issues: detect layout thrashing or repaint problems
-
Screenshot Node & Animation Inspector
a. Screenshot: right-click DOM element and "capture node screenshot" for taking a screenshot.
b.
Animations Tabhelps you analyze or reverse-engineer CSS animations.
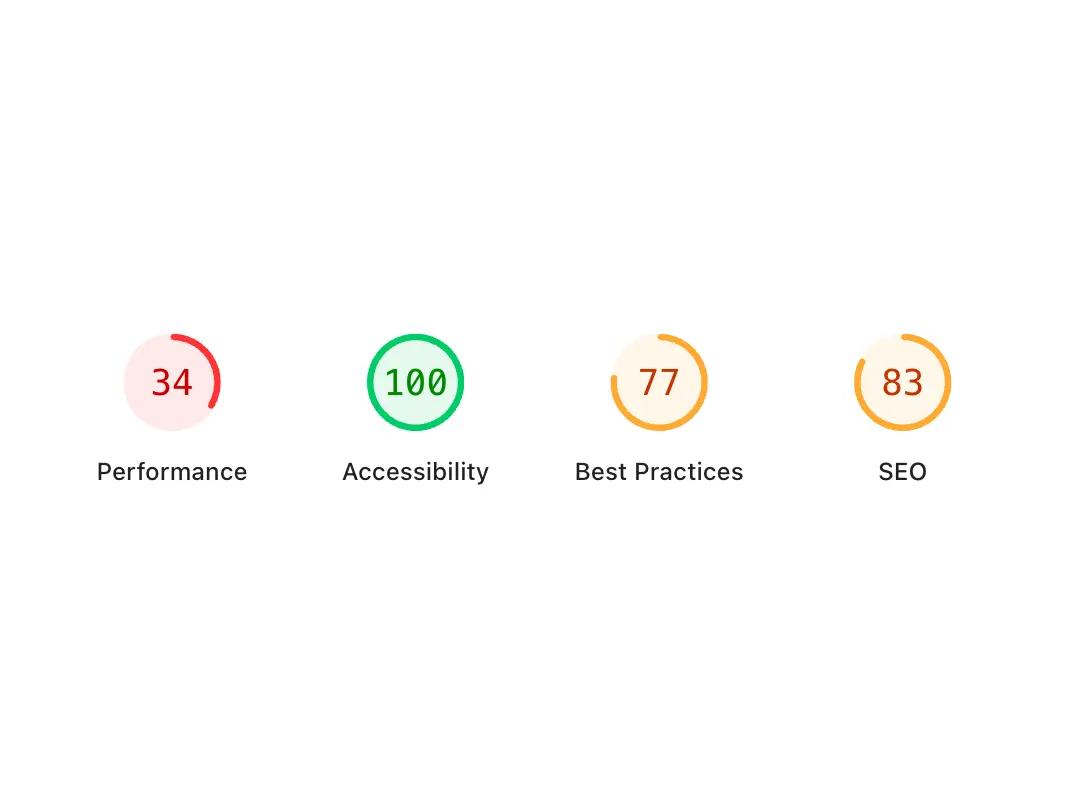
Web Performance Metrics
The Web Performance is very important since Google uses it to rank your site. A good metrics website means better ranking. We will learn all the performance metrics, how to improve, what are the standards.
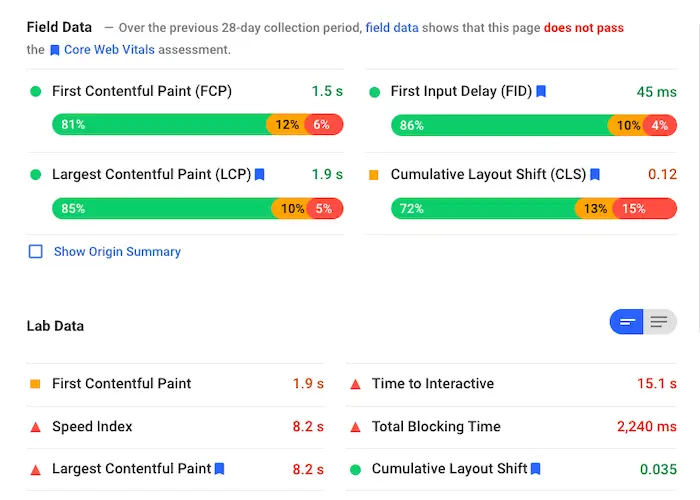
Where the metrics are extracted from?
Performance metrics can be achieved from two sources:
- Laboratory data: Data extracted with Lighthouse from machines (e.g. yours or simulated ones) that measures performance and extracts information.
- Field data: Data extracted from real users in your website. With the API Performance Timings, you can extract the information from each user and send it to a server.
a. Time to first byte (TTFB)
TTFB measures the time from browser's first request until the first byte received. This metric is extracted from data laboratory and real users.
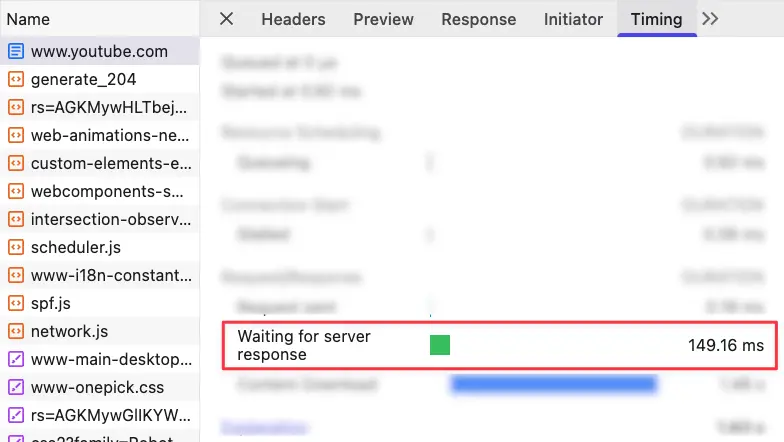
ℹ️ TTFB is a very important metric as it affects other metrics.
✅ < 600ms
Tips:
- Use caching aggressively.
- Place content closer to users with CDNs.
- Optimize backend logic and database calls.
b. First contentful paint (FCP)
FCP indicates the time took the page to display the first text or image.

ℹ️ Important since tells the user when the website is ready to use
✅ < 1.8s
c. Largest contetnful paint (LCP)
LCP measures the time took to display the largest resource in the viewport. Usually a hero image, large heading, or banner.
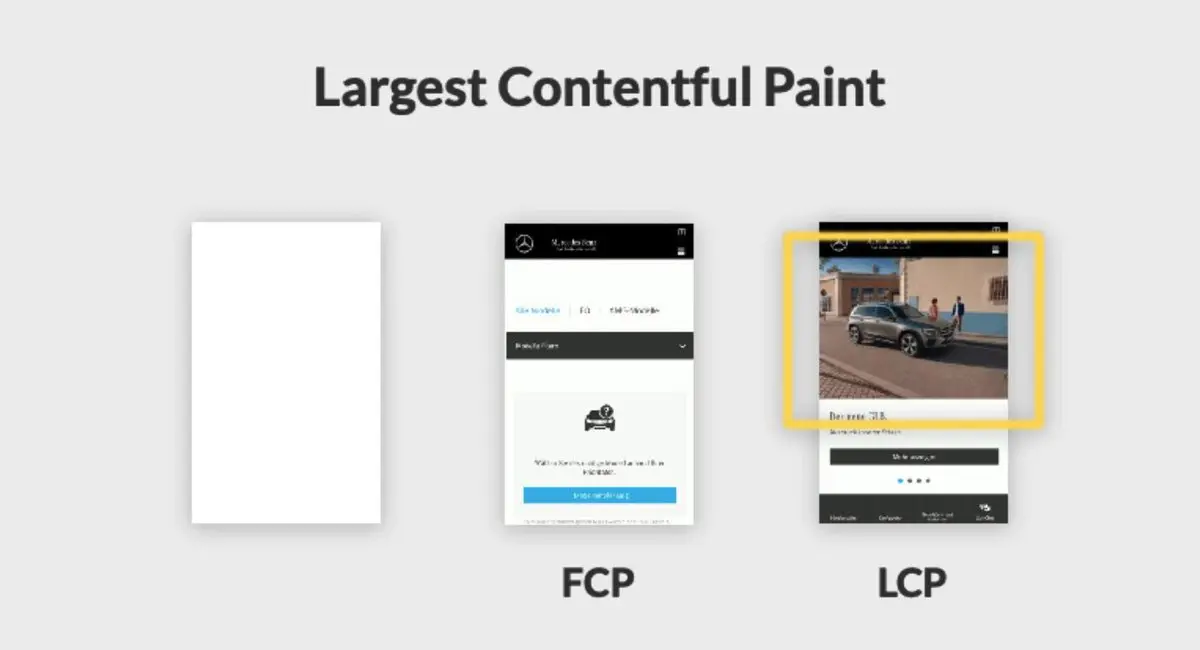
✅ < 2.5s
Tips:
- optimized images
- optimize critical CSS
- lazy-load non-essential scripts
- minimize render-blocking resources
d. Speed index (SI)
SI measures how quickly the visual content rendered in the viewport

ℹ️ To give you an idea, a blank page for 3 seconds that shows all the content at once is not the same as taking a little longer but showing content progressively. The person who visits the page will perceive it differently.
✅ < 3.4s
e. First input delay (FID)
FID measures the time between a user’s first interaction (click, tap, etc.) and the browser responding.
Usually JavaScript doing too much work and blocking the main thread.

ℹ️ This is part of the Web Vitals and gathers information on how many clicks you have done.
✅ < 100ms
f. Max ponential first input delay (mFID)
mFID measures the max FID taking into account the time took the main thread being blocked.
✅ < 130ms
g. Total blocking time (TBT)
TBT sums up all the longest Javascript tasks (>50ms) that blocked the main thread after FCP.
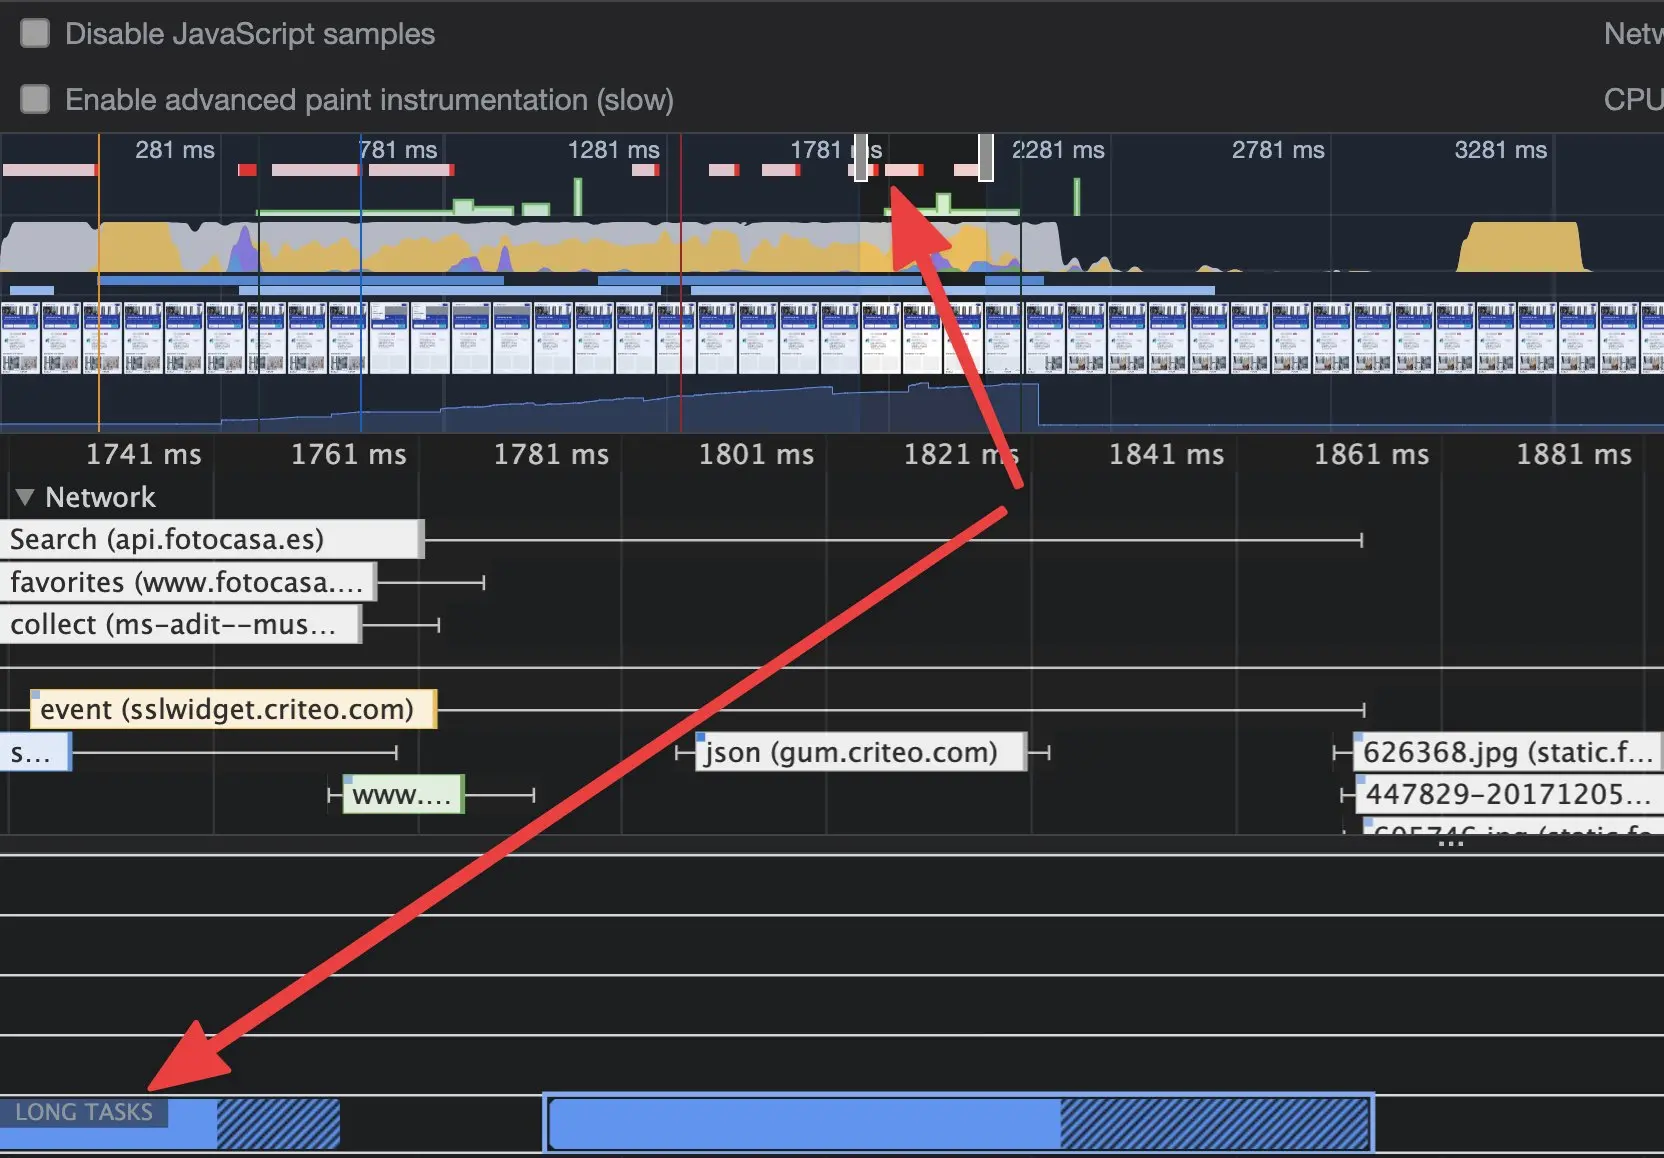
ℹ️ The longest time it blocked the main thread, less ranked the website.
✅ < 200ms
h. Time to interactive (TTI)
TTI measures when a page becomes fully interactive. All scripts loaded, main thread ready, user can click freely.
ℹ️ It's not very stable and little by little it has been abandoned in favor of him DTT.
✅ < 3.8s
i. Cumulative layout shift (CLS)
CLS measures all layout shifts that happened in the webpage while page was being loaded. Everyone hates when a button jumps as you click it.
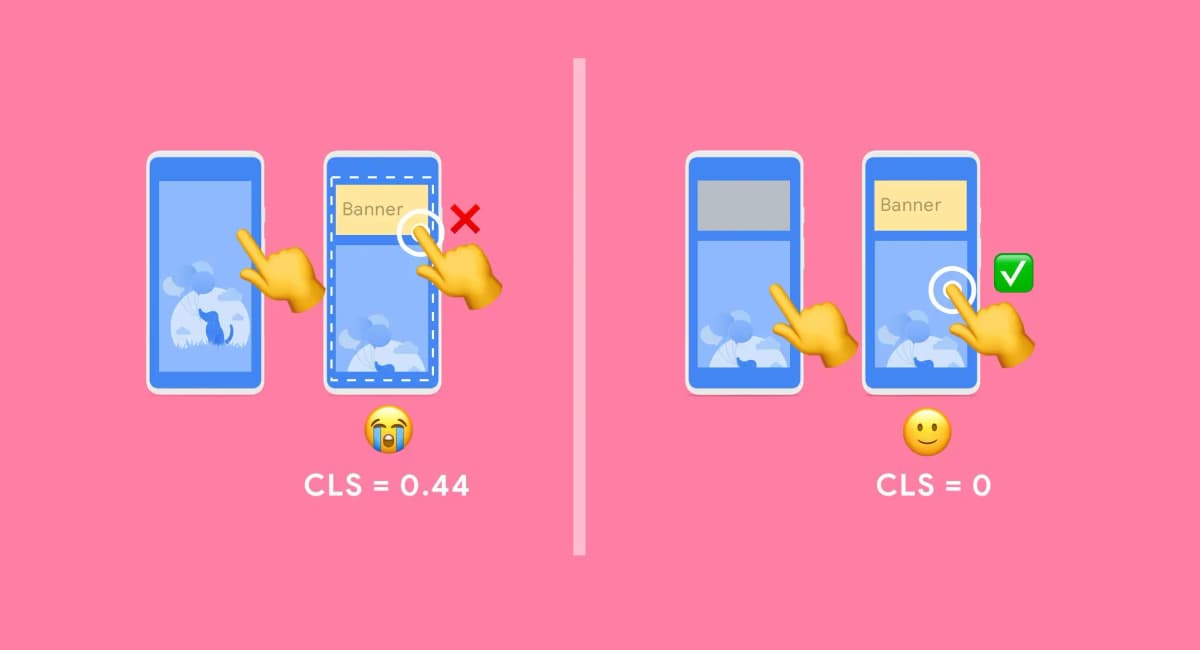
Tip:
- Always defining image dimensions.
- Reserving space for ads or embeds.
- Avoiding injected DOM shifts without placeholders.
✅ < 0.1 score
2. React Optimization Techniques
Optimizing React is about reducing unnecessary computation and re-rendering.
React.memo
Wrap pure components in React.memo to skip re-renders when props haven’t changed.
// Only re-render if the `name` prop changes
const MemoizedUserCard = React.memo(UserCard, (prevProps, nextProps) => {
  return prevProps.name === nextProps.name; // return true means skip re-render
});

// Usage
export default function App() {
  const [name, setName] = useState("Jose");
  const [age, setAge] = useState(26);

  return (
    <div>
	    <!-- it won't re-render if "name" props are same ->
      <MemoizedUserCard name={name} age={age} />

      <button onClick={() => setAge((a) => a + 1)}>Increase Age</button>
      <button onClick={() => setName("Carlos")}>Change Name</button>
    </div>
  );
}useMemo
Cache expensive calculations between renders.
const result = useMemo(() => heavyComputation(data), [data]);If it’s expensive and deterministic, memoize it.
useTransition
Mark state updates as non-urgent so React can keep the UI responsive.
Example: filtering large lists on every keystroke.
const [isPending, startTransition] = useTransition();

const handleChange = (e) => {
  const value = e.target.value;

  // takes normal time to update state
  setKeystroke(value);

  // 👇 wrap non-urgent setState
  startTransition(() => {
    // takes considerable time to update state
    setFilteredUsers(users.filter(u => u.includes(value)));
  });
};
React batches all setState, executing them together before the next rendering. Sometimes one setState (like setFilteredUsers()) takes longer than another, causing lag in the UI. Can you do better? You can tell React that some setState calls are non-urgent, stopping their execution if there's an urgent one, using useTransition().
In this example, on every keystroke, the app filters users. setFilteredUsers() and setKeystroke() are batched by React. setFilteredUsers() is expensive. On every keystroke, React has to wait setFilteredUsers() execution to finish before showing the next keystroke in the UI. The UI will feel non-responsive.
To fix it, make setFilteredUsers() be non-urgent so setKeystroke() happens immediately and the UI be responsive. Wrap setFilteredUsers() with startTransition.
Debounce
Make API calls to the server when the user finishes typing, not on every input change.
// Define a debounce function
function debounce (func, delay) {
	let timeoutId;

	return function() {
		clearTimeout (timeoutId);
		timeoutId = setTimeout(func, delay);
	}
}

// Define a function to handle the search operation
function handleSearch() {
	// Perform search operation
}

// Apply debounce to the handleSearch function with a delay of 300 milliseconds
const debouncedSearch = debounce(handleSearch, 300);

// Use the debounceSearch
Without debouncing, this leads to excessive API calls or unnecessary processing.
React Virtualized
For rendering large lists efficiently, only render what's visible on screen.
import { List } from 'react-virtualized';

function VirtualizedList({ items }) {
	return (
		<List
			width={300}
			height={400}
			rowCount={items.length}
			rowHeight={50}
			rowRenderer={({ index, key, style }) =>
				<div key={key} style={style}>
					{items[index]}
				</div>
			)}
		/>
	)
}
This cuts down on DOM elements and memory usage.
React Fragments
Use fragments (<>...</>) instead of unnecessary wrapper <div>s to reduce DOM nodes.
3. Rendering and loading performance
Defer, code splitting and lazy loading
Code splitting lets you split your React application into smaller chunks and load them on-demand. The code source isn't shipped to the browser until you request it, making the first browser bundle size smaller and improving performance. The goal: only load what's needed, when it's needed. This action is also called defer.
You can achieve code splitting in React using React.lazy() and Suspense.
React.lazy + Suspense
When to use:
Only for components. You want to render UI that is not needed initially, like modals, dashboards behind login, chart components.
import React, ( Suspense ) from 'react'

const LazyComponent = React.lazy(() => import('./LazyComponent'));

function App() {
	const [showPreview, setShowPreview] = useState(false);
	return (
		<br>
			<button onClick={() => setShowPreview(true)}>showPreview</button>

			{/* mount LazyComponent on-demand */}
			{
				showPreview ? (
					<Suspense fallback={<div>Loading...</div>}>
						<LazyComponent />
					</Suspense>
				)
				: null
			}
		</>
	)
}Lazy loading in Next.js: next/dynamic
Next.js’ dynamic() is a wrapper around React.lazy and Suspense with SSR control.
When to use:
Use this to dynamically import heavy dependencies such as charts, maps, or visualization libraries.
import dynamic from 'next/dynamic'

const DynamicMAUChart = dynamic(
	() => import("../components/MAUChart").then((mod) => mod.MAUChart),
  {
	  ssr: false,
	  loading: () => <p>Loading...</p>,
  }
)

export function Chart(props) {
  return <DynamicMAUChart {...props} />
}Lazy load on viewport
You can also use the Intersection Observer API with next/dynamic or React.lazy to only load and render code when it enters the user's viewport.
import { useInview } from "react-intersection-observer"

const DynamicMap = dynamic(
	() => import("./component/map-example").then( (mod) => mod.MapExample),
	{
		ssr: false,
		laoding: () => <div>Loading...</div>
	}
)

export function DynamicMap() {
	const [inView, viewRef] = useInView({ triggerOnce: true })

	return (
		<div className="w-full h-max" ref={viewRef}>
			{inView && <DynamicMap>}
		</div>
	)
}JavaScript native dynamic imports
You don't always need Next.js or React. JavaScript also supports dynamic imports natively. import() is a native JS feature that loads code on demand. Similar to next/dynamic but only for non-UI components.
When to use:
Use import() when you want to dynamically load utilities, heavy logic, or modules. Not UI components. Perfect for PDF generators, analytics libraries, date formatters, editor engines, etc.
// Super heavy computation
export async function generatePDF (data) (
	const pdfDoc = await PDFDocument.create();
	const page = pdfDoc.addPage([600, 400]);
	page.drawText(`Name: ${data.name}`);
	const pdfBytes = await pdfDoc.save();

	const blob = new Blob([pdfBytes], { type: "application/pdf" })
	const url = URL.createObjectURL(blob);
	window.open(url);
}

export default function App() {
	const handleDonwloadPDF = async () => {
		const data = { name: "John Doe" }
    // 🔍 import on-demand HERE
		const { generatePDF } = await import("./utils/pdf-generator")
		genertePDF(data)
	}
	return <button onClick={handleDownloadPDF}>Download PDF</button>
}
Explanation: The PDF code is loaded only when user clicks on Button.
Lazy Loading Images
For images not visible to the user in the first viewport, lazy load (or delay loading) images until the image is visible to the user. Meanwhile, place a placeholder or small-resolution image until the image is finally loaded.
1. Native HTML loading="lazy" attribute
The simplest approach is using the native loading="lazy" attribute on <img> tags. Modern browsers support this natively.
// Native HTML approach
<img
  src="/path/to/image.jpg"
  alt="Description"
  loading="lazy"
  width={800}
  height={600}
/>

// Next.js Image component with lazy loading
import Image from 'next/image'

<Image
  src="/path/to/image.jpg"
  alt="Description"
  loading="lazy"  // Next.js Image component supports this
  width={800}
  height={600}
/>
Pros: Zero JavaScript overhead, browser handles it automatically
Cons: Limited control over loading behavior, no placeholder support
2. React LazyLoad library
For more granular control, use libraries like react-lazyload to delay loading heavy images until they're visible.
import LazyLoad from 'react-lazyload'

function ImageGallery() {
  return (
    <div>
      <LazyLoad height={600} offset={100} once>
        <img src="/path/to/image1.jpg" alt="Image 1" />
      </LazyLoad>

      <LazyLoad height={600} offset={100} once>
        <img src="/path/to/image2.jpg" alt="Image 2" />
      </LazyLoad>
    </div>
  )
}
Configuration options:
height: Placeholder height (prevents layout shift)offset: Load images when they're X pixels away from viewportonce: Load image only once (default: false, will reload when out of viewport)
3. Lazy loading with blur placeholder (Intersection Observer)
The best user experience combines lazy loading with a blur placeholder until the image loads completely.
import { useState, useEffect, useRef } from 'react'

function LazyImageWithBlur({
  src,
  blurSrc,  // Low-quality placeholder (base64 or small image)
  alt,
  className
}) {
  const [isLoaded, setIsLoaded] = useState(false)
  const [isInView, setIsInView] = useState(false)
  const imgRef = useRef(null)

  useEffect(() => {
    const observer = new IntersectionObserver(
      ([entry]) => {
        if (entry.isIntersecting) {
          setIsInView(true)
          observer.disconnect()
        }
      },
      { threshold: 0.01 }
    )

    if (imgRef.current) {
      observer.observe(imgRef.current)
    }

    return () => observer.disconnect()
  }, [])

  return (
    <div
      ref={imgRef}
      className={`relative overflow-hidden ${className}`}
    >
      {/* Blur placeholder */}
      <img
        src={blurSrc}
        alt={alt}
        className={`absolute inset-0 h-full w-full object-cover transition-opacity duration-700 ${
          isLoaded ? 'opacity-0' : 'opacity-100'
        }`}
        style={{ filter: 'blur(20px)', transform: 'scale(1.1)' }}
        aria-hidden="true"
      />

      {/* Actual image */}
      {isInView && (
        <img
          src={src}
          alt={alt}
          onLoad={() => setIsLoaded(true)}
          className={`h-full w-full object-cover transition-opacity duration-700 ${
            isLoaded ? 'opacity-100' : 'opacity-0'
          }`}
        />
      )}
    </div>
  )
}

// Usage
function Gallery() {
  return (
    <LazyImageWithBlur
      src="/path/to/high-quality-image.jpg"
      blurSrc="/path/to/tiny-blur-image.jpg"  // or base64 placeholder
      alt="Gallery image"
      className="w-full h-96"
    />
  )
}
Next.js optimized version with blur placeholder:
import Image from 'next/image'
import { useState, useEffect, useRef } from 'react'

function BlurLazyImage({ src, blurDataURL, alt, width, height }) {
  const [isLoaded, setIsLoaded] = useState(false)
  const [isInView, setIsInView] = useState(false)
  const containerRef = useRef(null)

  useEffect(() => {
    const observer = new IntersectionObserver(
      ([entry]) => {
        if (entry.isIntersecting) {
          setIsInView(true)
          observer.disconnect()
        }
      },
      { threshold: 0.01, rootMargin: '50px' }
    )

    if (containerRef.current) {
      observer.observe(containerRef.current)
    }

    return () => observer.disconnect()
  }, [])

  return (
    <div ref={containerRef} className="relative overflow-hidden">
      {/* Blur placeholder */}
      <div
        className={`absolute inset-0 transition-opacity duration-700 ${
          isLoaded ? 'opacity-0' : 'opacity-100'
        }`}
      >
        <Image
          src={blurDataURL}
          alt={alt}
          width={width}
          height={height}
          className="h-full w-full object-cover"
          style={{ filter: 'blur(20px)', transform: 'scale(1.1)' }}
          aria-hidden="true"
        />
      </div>

      {/* High-quality image */}
      {isInView && (
        <Image
          src={src}
          alt={alt}
          width={width}
          height={height}
          onLoad={() => setIsLoaded(true)}
          className={`transition-opacity duration-700 ${
            isLoaded ? 'opacity-100' : 'opacity-0'
          }`}
        />
      )}
    </div>
  )
}
You can implement the blur algorithm used in this repo:
- Blurha Github's repo
- using ffmpeg, read this article
Web Workers
JavaScript is single-threaded. For CPU-heavy tasks, offload computation to a Web Worker so it doesn’t block rendering.
Use it for data parsing, image processing, or complex calculations.
4. Server and Network Optimization
Use Streaming with React Server Components (RSC)
Stream dynamic or async computation (e.g., data fetching) from the server to the client, using a Suspense boundary.
This allows you to render static HTML first while the dynamic content is streamed to the client.
async function RenderBLogPost() {
	const posts = await getBlogPosts();
	return (
		<div className="grid gap-6 md:grid-cols-2 lg:grid-cols-3 lg:gap-8">
			{posts.map((post) => (
				<BlogCard key={post.id} post={post} />
			))}
		</div>
}

// 🔍 Streaming happens HERE
function BlogPost() {
	return (
    // static html ...

		<Suspense fallback={<div>loading...</div>}>
      {/* dynamic html */}
			<RenderBlogPost />
		</Suspense>

    // more static html ...
	)
}Server-Side Rendering (SSR)
SSR renders HTML on the server, and the resulting HTML is sent to the client.
Why is better:
- Better Performance: SSR improves first load time because it sends pre-rendered HTML to the client, reducing the client bundle.
- SEO Optimization: Search engines can crawl and index the content of SSR pages more easily, as they receive the complete HTML content upfront.
- Avoid SSR for highly interactive dashboards where client-side hydration can outweigh the benefits.
Use Next.js or Tanstack Start, they have SSR out of the box.
Content Delivery Network (CDN)
A CDN brings your assets geographically closer to users:
- Reduced latency
- Improved scalability
- Lower bandwidth on your origin server
Use it for static assets: images, JS, CSS, and fonts.
5. Asset Optimization
Small files mean fast load times and happy users.
- Images: compress via squoosh.app
- Videos: compress via ffmpeg.org
- Fonts: convert
.ttf→.woff2with cloudconvert.com - Remove dependencies: audit your
package.jsonfor large or unused libraries.